A Diagnosis – Compartment Syndrome

Hello friends! This post has been a long time coming – the diagnosis of an injury I’ve been chasing down for over two years now. After years of tests and PT, I finally turned over the last potential testing stone on Tuesday – the compartment syndrome test. And to no surprise to me, by this point, the test came back positive for compartment syndrome. I’ve spent the past week relieved to have an answer and a path forward but also accepting what my life is going to look like for the next three-plus months! The road to recovery is going to be a long one, but I’m holding onto hope that I’ll be able to get back to a pain-free, active life!
I’ve described a bit below about what it’s taken to get this diagnosis, about the test, what compartment syndrome is and how I move forward past this. The more I read, the more nervous I get about how painful this is going to be and some of the obstacles that could come up throughout my road to healing. I probably need to stop reading until I get into the Dr. on the 10th! Here we go, guys.
The Road to Diagnosis
Roughly two and a half years ago, while training for my second full marathon, I started to experience pain in my outer shin, outer ankle, and the outer side of my foot on both legs (though mostly my left). Over the past two years, as I continued my running journey, the pain has progressed in different ways. I’ve had:
- Ankle pain
- Outer foot pain
- Bottom of my foot pain
- Shin pain on both sides
- Calf pain
- Muscle tightness in all of the areas above
- Swelling in my ankles and feet
- A feeling that my legs are never recovering unless I take a week off from working out
- Tingling in my ankle/foot while running through the pain during one my half marathons
- Sometimes throbbing pain that would keep me up at night or leave me feeling like I didn’t want to get off the couch
Throughout all of this, I’ve tried:
- Physical Therapy
- Chiropractic work
- Evaluations from both traditional and natural-path dr.’s
- Xrays my feet, ankle, and shins
- MRIs on my feet, ankle, and shins
- Blood work
- KT Tape
- Compression sleeves
- Custom orthotics
- Different styles of shoes
While some of these things helped to reduce the pain through running, nothing solved the core problem. I had good days where I could run pain-free for what felt like forever, and I had really, really, really bad days where I came home crying out of frustration and pain. I never knew what was going to be a good day and what was going to be a bad day. I never knew what would spark the symptoms – it could be a long walk, yoga, or a run.
The funny thing to me is that I still managed to hit my running goals: 12 half marathons in 12 months, a marathon PR, and a half marathon PR. But at a certain point last fall, I feel like I had hit a plateau. I couldn’t get my legs to move any faster. I couldn’t recover soon enough – despite my tries on reducing salt and increasing anti-inflammatory foods, etc. It wasn’t until the beginning of June when I finally decided maybe the only way my body would heal, is by time off running. Not running has helped, but the symptoms still exist.
With every Dr. visit, the Dr. questioned whether it could be compartment syndrome, but mentioned that my symptoms weren’t what they would typically expect to see for that diagnosis. So we continued to try every single thing possible until this test was my only option, left.
Compartment Syndrome Testing

The testing for compartment syndrome is expensive and really uncomfortable, so doctors try to do everything they can to ensure your condition/injury is nothing else before they put patients through the test. The machine that does the pressure reading is $3,000, and each needle is $500.
Here is my experience of compartment syndrome testing for my lower legs:
- Arrive and get settled: I arrived at my sports medicine doctor last Tuesday with the company of my husband, who was there for moral support. I filled out the usual forms and made my way back to the patient room where I settled in on the medical exam table. Luckily you don’t need to change into a gown for this exam – you wear your athletic shorts and top.
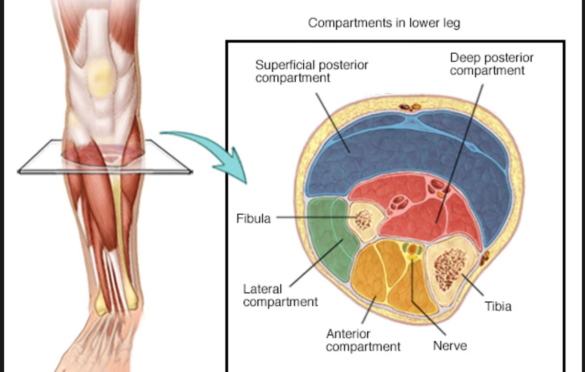
- Identifying 4 test points: Next, the Dr. identified the location of where she wanted to test by touch. She picked a spot on my outer, upper leg and a spot on my inner, lower leg on each side and drew a circle around each spot using a marker. Since it’s my outer leg that experiences pain, she wanted to get a comparison of compartment pressure using my inner, lower leg. She then cleaned off the location she would be testing.
- She gave me a massage tool that vibrated and instructed me to place it on my knee and hold it there each time she inserted a needle. The vibrating conducted through your bones will reach your brain and distract you before the pain from the needles reaches your brain. I have no clue if this made it better, but it was worth a shot (ha!).
- Numbing: Next the Dr. used a Lidocaine shot to numb the skin where she would be inserting the test needle in all four locations. The shots stung a bit, especially the ones on my inner legs.
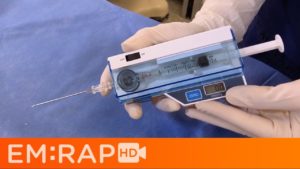
- Pressure test: Next the Dr. wanted to get a pressure measurement of my muscle compartment before running so that she should see the difference in pressure before and after exercise. Now time for the dreaded needle. I watched several youtube videos of the test, in hopes to mentally prepare for this (this one is a good example except that my activity was running on a treadmill).
- The Dr. inserted the needle into each spot and got a pressured reading within 10-15 second. I was surprised at how quickly the test went! As she got a pressure reading, she read the reading aloud to her receptionist who was in the room specifically to write them down. I had been told the procedure was fairly uncomfortable and painful, but to my surprise having the pressure needles inserted 2-3cm into my muscles was not nearly as painful as I thought it would be. I would describe it as uncomfortable, but the pain is tolerable. The Dr. immediately put pressure on the points where the needle had been to stop the bleeding.
- At this point, my readings on my outer legs were beyond normal. So we pretty much knew what my diagnosis was before I even got on the treadmill. A normal reading for pressure in the compartment is 25 mmHg, my outer legs were 46 mmHg and 33 mmHg.
- Running: Next, I got on the treadmill and ran at a good pace (9 min/mile) for 7 minutes. As symptoms popped up (pain, tingling, tension, etc.), I let Tim know, and he wrote down the time and symptoms for me. After running, we waited 5 minutes before testing again.
- Pressure test: Next, I went back into the procedure room where I lied down on the table and had pressure readings in the same spots as the previous time. The second time around was more painful – not terrible but enough pain to make you cringe a bit.
The Dr. was able to give a diagnosis immediately. The pressure in my outer leg compartments increased in one leg and slightly decreased in the other, but still above the average threshold. The diagnosis? Compartment syndrome.
What is Compartment Syndrome?

![]() Per Mayo Clinic, “Chronic exertional compartment syndrome is an exercise-induced muscle and nerve condition that causes pain, swelling and sometimes disability in the affected muscles of your legs or arms. Anyone can develop the condition, but it’s more common in athletes who participate in activities that involve repetitive impact, such as running. When you exercise, increased blood flow to working muscles expands them. If the connective tissue (fascia) that binds the muscle fibers in a compartment doesn’t also expand, pressure builds up in the compartment. Over time, the pressure cuts off some of the muscle’s blood supply.”
Per Mayo Clinic, “Chronic exertional compartment syndrome is an exercise-induced muscle and nerve condition that causes pain, swelling and sometimes disability in the affected muscles of your legs or arms. Anyone can develop the condition, but it’s more common in athletes who participate in activities that involve repetitive impact, such as running. When you exercise, increased blood flow to working muscles expands them. If the connective tissue (fascia) that binds the muscle fibers in a compartment doesn’t also expand, pressure builds up in the compartment. Over time, the pressure cuts off some of the muscle’s blood supply.”
Path Foward
It seems apparent that I have one option forward if I want to get back to my normal, active life. And that option is surgery. What I know of the surgery is:
- They’ll put me under, make two incisions on each leg and cut open the muscle compartment to create space
- They’ll sew me back up, and send me home in what I understand will be a lot of pain.
- I’ll be in PT the day after surgery to get on a stationary bike without resistance. The goal will be to keep scar tissue from developing in the same place as my muscles were before. If the scar tissue forms in the same way, my understanding is the surgery would have been useless.
- Recovery should take about six weeks. After six weeks, the doctor said I should be able to start running again.
That’s about all I know at this point! Next step is to meet with the Dr. who will be performing the surgery on the 10th to get more info. I’ll keep you all posted as this evolves!
